Zapier / Slate Integration 💻
This documentation covers integrating Zapier, a third-party middleware platform, with Slate. Zapier is used for a variety of reasons, but most commonly to send marketing leads captured in LinkedIn or Meta to Slate. The documentation assumes you have a Zapier account set up already. If you have not done so, you’ll need to create one in Zapier before getting started.
Creating a Zap to Send Data to Slate
-
Begin to set up your “Zap” in Zapier, configured to the appropriate source. (LinkedIn or Facebook.) You should be able to complete Step 1, which is to set up your trigger and connect to your desired source.
-
If this is your first integration with Zapier and you have not created a Zapier Service Account, contact your Slate Administrator to set one up. (If you have Slate access, you can search “Zapier” in User Permissions to see if a Service Account exists. If one does exist, you will want to make note of the username/password as you will use it in the Zap configuration later on.)
-
Create a Source Format in Slate to capture the specific leads. Name it something clear and concise - ex. “LinkedIn Leads”. Your Source Format settings should be configured as follows:
-
Status = Active
-
Name = (see #2 for an example)
-
Format = (leave blank)
-
Type = One time/differential
-
Remap As of Date = (leave blank)
-
Remap Active = Active
-
Scope = Person/Dataset Records
-
Dataset = Person/Application Records
-
Unsafe = Unsafe
-
Hide = Create source interactions
-
Disable Update Queue = Allow records to enter update queue
-
Update Only = Allow record creation
-
Dedupe Records = Dedupe records within source
-
Notification = (leave blank, unless you want to be notified)
-
Read Permission = (leave blank)
-
Upload/Build Permission = (leave blank)
-
On the Source Format settings, navigate to the “Format Definition” tab. You will need to specify a layout using XML. Example:
<layout type="json" node="/">
  <f id="first" s="first" />
  <f id="last" s="last" />
  <f id="email" s="email" />
</layout>
The <f id= part refers to the name of the field in Slate, and the s= part refers to the name of the field in the source file, which is defined in the “Data” section of Zapier. It is recommended that your Zapier field names match the Slate field to reduce confusion. To add a new field to your XML layout, simply copy the last line of the <f id= expression and change the field names to your new field.
Once your Slate source format is configured, save it and return to Zapier.
-
In Step 2, In the “Set Up Action” section of the Zap configuration:
-
The data section is where you will specify which data points you want to transfer from your form. On the left side, you will specify a field name for your data point. It is recommended that your Zapier field names match your Slate field names to reduce confusion.
-
On the right side, select which data points you want to bring in.
-
-
URL = Web Service URL from the Slate Source Format configuration.
-
Payload Type = Raw
-
Data
-
Wrap Request in Array = Yes
-
File = (leave blank)
-
Unflatten = No
-
Basic Auth = username|password (from the Zapier Service Account)
-
Headers = (leave blank)
-
Select continue to test your action.
-
Test your action by sending a request to Webhooks by Zapier. This should push a Zapier file to your Source Format in Slate. Navigate to your Slate Source Format to confirm receipt of the test file. Force Process Import to import the test file
-
Your test data should import and appear as (0/1). Remap your source format to ensure data points are mapped correctly. Refresh Prompt Values for any prompt-based fields. Add any static mappings that are needed. Perform a retroactive refresh to update your test record. Review your test record to ensure all data is appearing as expected.
-
Return to Zapier. Click “Publish Zap.”
-
You may be presented with an option to Transfer Existing Data. This will bring all historic data from your form into Slate. If you want to bring that into Slate, click Transfer Existing Data. However, if you only want to bring in NEW form responses, click “Go to My Zaps.”
-
Clicking “Transfer Existing Data” will take you to a new screen where you can view historic form responses and corresponding data points based on the fields you selected in the earlier Data setup and select which records you want to send to Slate. Zapier will send all leads as individual files (NOT as one file containing a number of records.)
-
Repeat the process to set up a new Zap in Zapier as many times as needed.
Troubleshooting Common Issues
Generally Helpful Things to Check First
-
In Zapier, try to identify which Zap is throwing the error. Once you’ve determined the Zap, edit it and take a look at the “2. POST” action settings. This step determines what data is sent to Slate and how it is sent.
-
In Zapier, the “Data” section controls the field mappings. This is the usual culprit for issues with import to Slate. Make sure all fields are mapped to fields in the lead form. You should see a preview of real data.

-
If you are receiving an error message in Slate, download the file from Slate to double check what was sent from Zapier. This can indicate an issue with the mappings (if no data from the lead form is present) or it can indicate an issue with the XML format definition (if the data present in the export file does not match the format definition in Slate.)
-
If no data is coming to Slate from Zapier, double check that the web services URL from the source format and the URL from the “2. POST” action in Zapier match.
Problem: Leads are not being imported into Slate.
Troubleshooting:
-
Log into Zapier. Verify that you are not out of Zaps. This may involve increasing the Zapier plan to a higher tier. Also verify that the correct payment information is on file. Most commonly, an error with payment or a task exceeding monthly allotted Zap runs is the culprit for leads not importing.
-
Using the left sidebar, navigate to “Zap History.”
-
Zap History displays a history log of all the zaps that have run. You can also see overall stats regarding your zaps, but for most troubleshooting purposes, you don’t need this information.
-
- Click on “Zap Runs”
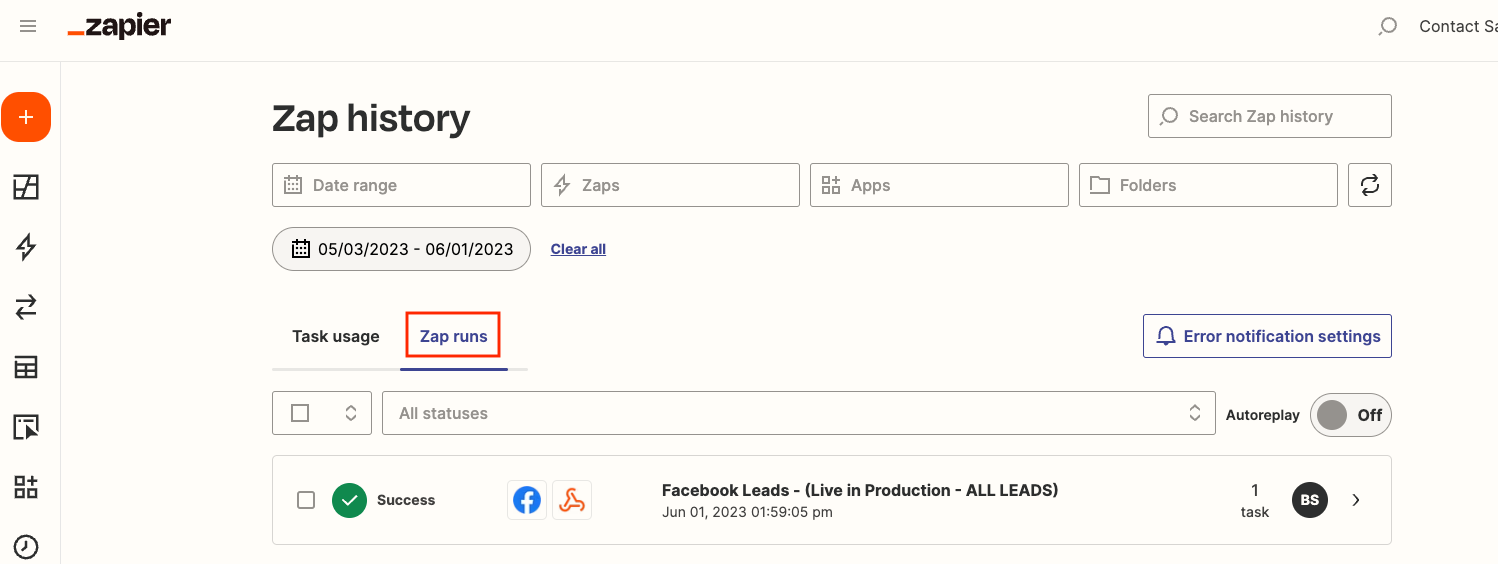
- Under “Zap Runs,” click into the box which says “All statuses.” A dropdown menu will appear where you can select specific statuses to search by. Leads that have not been imported to Slate will appear under the statuses “Stopped/Errored,” “Stopped/Halted,” or “Waiting/Delayed” (although Waiting/Delayed is the least common.)
-
Select the “Stopped/Errored” or “Stopped/Halted” statuses. This will filter the results so you are only seeing the leads that have been stopped from importing.
-
Using the master select box at the top right, directly under “Task Usage”, to “Select all (5000) at a time.” This will ensure you select all leads, up to 5,000 at a time, to re-send to the CRM.
-
Select “Replay (#)”. Clicking this will replay the leads and send them to the CRM.
-
If this doesn’t work, review the details in Step 1.
-
Problem: Leads are coming into Slate, but Slate is throwing an error message.
Troubleshooting: Depending on the error message, there is likely a mismatch with the XML format definition and what is being sent in the source file from Zapier. The source file must match the format definition, so there cannot be any extra fields in the source file that are not declared in the format definition in Slate.
-
Starting from the Slate Source Format, download one of the errored files to check what is coming from Zapier. The file should contain at least first name, last name, and email, although this could vary between lead forms. If the file doesn’t contain any lead form data, you will need to check the field mappings in Zapier to make sure that the lead form fields are correctly mapped to export fields.
-
If the file does contain lead form data and the error message in Slate references “Xml.XPath.XPathException: ‘First name’ has an invalid token’” OR other Xml.XPath related language, it’s likely that there is an issue in the XML format definition and what is being sent from Zapier.
-
Edit the source format and navigate to the “Format Definition” tab. Compare the XML format definition to the field mappings in Zapier. The field mappings in Zapier and the format definition should match, including the field names in the format definition. For example, the error referenced above ‘First name has an invalid token’ resulted from a field name mismatch between Zapier and Slate’s format definition.
-
Note: In Zapier, if the field mapped has an exclamation mark beside it, it’s not a part of the lead form and cannot be included in the export file. You will need to choose a different field from the lead form to resolve this issue.
-
See also POST Data to Slate
Thanks!
No comments to display
No comments to display